这篇主要是汇总了一些PyTorch实操中常见的函数。参数写法以及代码示例来自官方文档或者开源模型代码,图片出处见水印。
PyTorch基本张量操作
-
创建tensor
- 直接创建:
torch.tensor(data) - 从numpy创建:
torch.from_numpy(np_array)
- 直接创建:
-
拼接tensor:
torch.cat(tensors, dim=0, *, out=None)将张量按照 dim 维度进行拼接
1
2
3
4
5
x = torch.randn(2, 3) # shape:torch.Size([4, 3]) torch.cat((x, x, x), 0) # shape:torch.Size([2, 6]) torch.cat((x, x, x), 1) -
复制tensor:
torch.tensor.repeat(size)参数表示在对应dim上的重复次数
1
2
3
4
5
6
7
8
9
x = torch.tensor([1, 2, 3]) # 行重复4,列重复2 x.repeat(4, 2) ''' tensor([[ 1, 2, 3, 1, 2, 3], [ 1, 2, 3, 1, 2, 3], [ 1, 2, 3, 1, 2, 3], [ 1, 2, 3, 1, 2, 3]]) ''' -
改变维度
- 二维矩阵重新排列:
torch.transpose(input, dim0, dim1) - 多维矩阵重新排列:
torch.permute(input, dims)
(与
view()/reshape()的区别:permute()得到是转置,而非张开再重新排列,permute()更适合来处理高维)- 压缩去掉维数为1的的维度:
torch.squeeze(input, dim=None, out=None) - 给指定位置加上维数为一的维度:
torch.unsqueeze(input, dim)
1
2
3
4
5
# 组合使用来处理图片数据格式 -> [batch_size, n_channels, hight, width] img_tensor = torch.from_numpy(img).float().permute(2, 0, 1).unsqueeze(0) # 读取的图片是numpy格式(h,w,c)但是torch处理的数据是(c,h,w) # 图片size比如是(28,28,3),那么 permute(2,0,1) 得到一个size为(3,28,28)的tensor # unsqueeze(0)后就会在0的位置加了一维,用于batchsize即批处理大小维度 - 二维矩阵重新排列:
PyTorch梯度计算
- 确认求导:
requires_grad=True - 自动求导:
torch.autograd.grad(outputs, inputs, grad_outputs=None, retain_graph=None, create_graph=False, only_inputs=True, allow_unused=False)
|
|
-
得到不具备梯度的张量:
tensor.detach()训练网络的时候可能希望保持一部分的网络参数不变,只对其中一部分的参数进行调整;或者只训练部分分支网络,并不让其梯度对主网络的梯度造成影响,这时候就需要使用detach()函数来切断一些分支的反向传播。
-
梯度清零:
grad.zero_()和optimizer.zero_grad()每次反向传播求导时,计算的梯度不会自动清零。如果进行多次迭代计算梯度而没有清零,那么梯度会在前一次的基础上叠加。
-
停止梯度计算:
@torch.no_grad()在某些情况下并不需要对模型进行梯度更新,例如在模型推理时或者在评估模型性能时,可以将这句放在代码段前,关闭梯度计算(不会影响计算图的构建和前向传播的计算)。
PyTorch数据处理 torch.utils.data
-
Dataset和DataLoader
Dataset定义了数据集的内容,它相当于一个类似列表的数据结构,具有确定的长度,能够用索引获取数据集中的元素。而DataLoader定义了按batch加载数据集的方法,它是一个实现了
__iter__方法的可迭代对象,每次迭代输出一个batch的数据。DataLoader能够控制batch的大小,batch中元素的采样方法,以及将batch结果整理成模型所需输入形式的方法,并且能够使用多进程读取数据。在绝大部分情况下,用户只需实现Dataset的
__len__方法和__getitem__方法,就可以轻松构建自己的数据集,并用默认数据管道进行加载。1 2 3 4 5 6 7 8 9 10 11 12 13 14 15 16 17 18 19 20 21 22 23 24class Dataset(object): def __init__(self): pass def __len__(self): raise NotImplementedError def __getitem__(self,index): raise NotImplementedError class DataLoader(object): def __init__(self,dataset,batch_size,collate_fn,shuffle = True,drop_last = False): self.dataset = dataset self.sampler =torch.utils.data.RandomSampler if shuffle else \ torch.utils.data.SequentialSampler self.batch_sampler = torch.utils.data.BatchSampler self.sample_iter = self.batch_sampler( self.sampler(range(len(dataset))), batch_size = batch_size,drop_last = drop_last) def __next__(self): indices = next(self.sample_iter) batch = self.collate_fn([self.dataset[i] for i in indices]) return batch
PyTorch模型操作 torch.nn
模型自定义操作基本上都是继承 torch.nn.Module 类来实现的。
-
模型参数:
torch.nn.parameter.Parameter(data=None, requires_grad=True) -
模型容器
torch.nn.ParameterList:像 list 一样存储一堆参数。torch.nn.ParameterDict:像 dict 一样存储一堆参数。
1 2 3 4 5 6 7 8 9 10 11class MyModule(nn.Module): def __init__(self): super(MyModule, self).__init__() self.params = nn.ParameterDict({ 'left': nn.Parameter(torch.randn(5, 10)), 'right': nn.Parameter(torch.randn(5, 10)) }) def forward(self, x, choice): x = self.params[choice].mm(x) return xtorch.nn.Sequetial:按照顺序包装多个网络层,内部forward已经实现。
1 2 3 4 5 6 7 8 9class single_conv(nn.Module): def __init__(self, in_ch, out_ch): super(single_conv, self).__init__() self.conv = nn.Sequential(nn.Conv2d(in_ch, out_ch, 3, stride=1, padding=1), nn.BatchNorm2d(out_ch), nn.ReLU(inplace=True),) def forward(self, x): return self.conv(x)torch.nn.ModuleList:像 list 一样包装多个网络层,可以迭代。ModuleList中元素的先后顺序并不代表其在网络中的真实位置顺序,需要经过forward函数指定。
1 2 3 4 5 6 7 8 9class ModuleList(nn.Module): def __init__(self): super(ModuleList, self).__init__() self.linears = nn.ModuleList([nn.Linear(10, 10) for i in range(20)]) def forward(self, x): for i, linear in enumerate(self.linears): x = linear(x) return xnn.ModuleDict:像 dict一样包装多个网络层,通过 (key, value) 的方式为每个网络层指定名称。
1 2 3 4 5 6 7 8 9 10 11 12 13 14 15 16 17 18# 创建了两个 ModuleDict,在前向传播时通过传入对应的 key 来执行对应的网络层 class ModuleDict(nn.Module): def __init__(self): super(ModuleDict, self).__init__() self.choices = nn.ModuleDict({ 'conv': nn.Conv2d(10, 10, 3), 'pool': nn.MaxPool2d(3) }) self.activations = nn.ModuleDict({ 'relu': nn.ReLU(), 'prelu': nn.PReLU() }) def forward(self, x, choice, act): x = self.choices[choice](x) x = self.activations[act](x) return x -
创建模型过程
1 2 3 4 5 6 7 8 9 10 11 12 13 14class Module(nn.Module): def __init__(self): super(Module, self).__init__() # ...... def forward(self, x): # ...... return x data = ..... # 输入数据 # 实例化上面的类来定义模型 model = Module() # 前向传播 model(data) -
模型保存:
torch.save(model, path) -
模型读取:
model = torch.load(path) -
Dropout抑制模型过拟合:
torch.nn.Dropout(p=0.5, inplace=False) -
模型训练:
model.train()保证 BN 层能够用到每一批数据的均值和方差,对于 Dropout是随机取一部分网络连接来训练更新参数。
-
模型评估:
model.eval()模型测试前使用,不启用 Batch Normalization 和 Dropout,保证 BN 层能够用到所有数据的均值和方,对于 Dropout是不随机舍弃神经元,用所有网络连接。
PyTorch常用vision功能函数 torch.nn.functional
- 差值计算:
torch.nn.functional.interpolate(input, size=None, scale_factor=None, mode='nearest', align_corners=None, recompute_scale_factor=None, antialias=False)
|
|
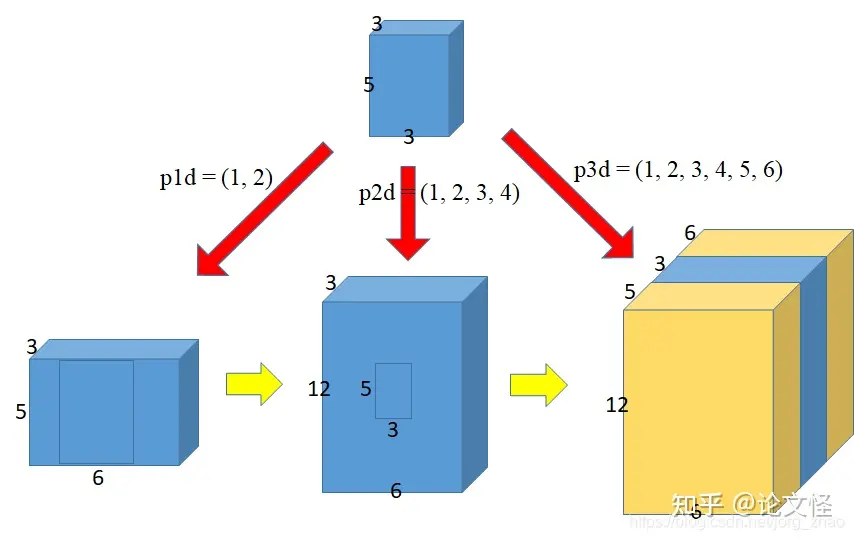
- 扩充张量:
torch.nn.functional.pad(input, pad, mode='constant', value=0)
|
|
- 把维度(B, Crr, H, w) 重新排列成 (B, C, Hr, wr):
torch.nn.functional.pixel_shuffle(*input*, *upscale_factor*)**
|
|
- 从批量输入张量中提取滑动局部块:
torch.nn.functional.unfold(input, kernel_size, dilation=1, padding=0, stride=1)
|
|
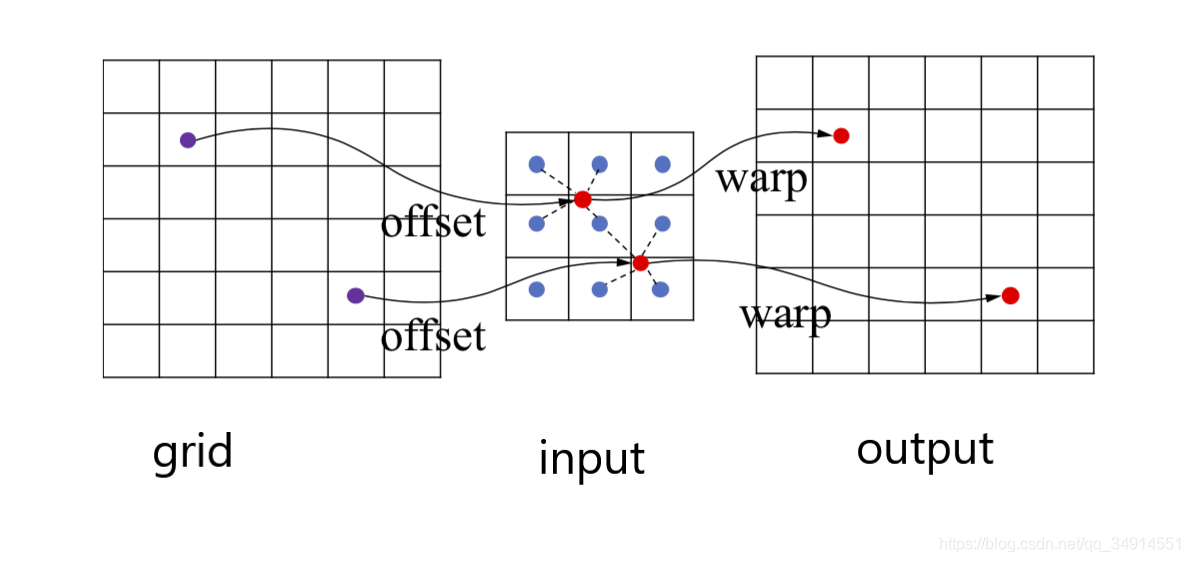
- 将input通过grid映射到output上:
grid_sample(input, grid, mode='bilinear', padding_mode='zeros', align_corners=None)
|
|
PyTorch模型GPU训练
- 获取设备
|
|
- CPU和GPU的相互转换
|
|
- 多GPU分布式训练:
torch.nn.DataParallel(module, device_ids=None, output_device=None, dim=0)
|
|
PyTorch可视化 torch.utils.tensorboard
- 指定文件夹保存数据:
SummaryWriter()
|
|
- 可视化标量参数(损失函数、准确率等):
add_scalar(tag, scalar_value, global_step=None, walltime=None)
|
|
- 添加图像数据:
add_images(tag, img_tensor, global_step=None, walltime=None, dataformats='NCHW')
|
|
- 终端打开命令:
tensorboard --logdir=runs/